
MSTS
Easy Texture Manipulation
Alpha Channel
NOTICE:
This web page is not optimized for tablet or mobile devices.
It is recommended you use a computer to view this page.
This web page is not optimized for tablet or mobile devices.
It is recommended you use a computer to view this page.
This tutorial explains basic manipulation of the alpha channel of a texture, using common and free tools. Making chunks of the texture appear visible or invisible can change the way a texture can be used. Finer changes to the alpha channel, especially those involving curved edges, are best left to more sophistocated methods.
This page, its text and images, are Copyright © 2018 JJH/Jovet. The text and images on this page are not to be copied or used elsewhere without the prior permission of the author.
Microsoft Train Simulator is a registered trademark of Microsoft Corporation. The Microsoft Train Simulator logo is also a trademark of and owned by Microsoft Corporation.
This page is not authored or endorsed by Microsoft Corporation.
Microsoft Train Simulator is a registered trademark of Microsoft Corporation. The Microsoft Train Simulator logo is also a trademark of and owned by Microsoft Corporation.
This page is not authored or endorsed by Microsoft Corporation.
Requirements
This tutorial requires two pieces of software:- TGATools2A with Ace-It!. — This can be downloaded here. Be sure to install both components.
- Windows™ Paint. — This comes with Windows™. The version from Windows XP® is preferred to the newer versions, for its simplicity and flat-features, and will be shown here.
Procedure
- Make a copy of the .ace texture file you intend to modify. Keep it in the same folder with a special filename, or copy it to a safe place.
-
Open the file in TGATools2A. The simplest way to do this is to right-click the file, and choose Open With, and choose MSTS TGA/ACE Bitmap Manipulator. If that isn't in the list, use the Choose default program... menu option to browse for the TGATools2A.exe file, and select it.
Once loaded, it should look like this:
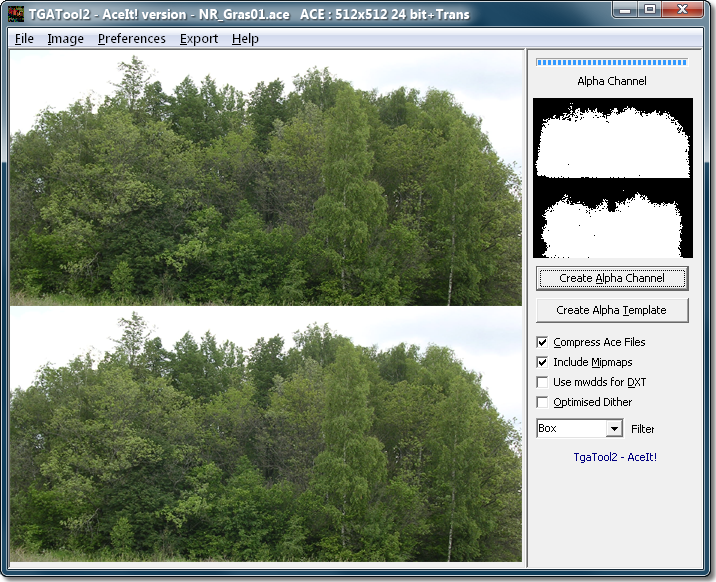 Figure 1 – The TGATools2A window with example texture file loaded.
 - Notice the parts of the TGATools2A window. The color portion of the image is shown on the left-hand side. The alpha portion is shown, in reduced size, on the top-right side—remember, it is the equivalent of a grey-scale bitmap. The texture filename NR_Grass01.ace and image format 512x512 24 bit+Trans are shown in the title bar. Make a note of these for later when you export the new texture file.
-
Save the texture file as a .tga Targa file with the File and Save commands. I suggest you save it alongside the .ace file you intend to modify.
Because creating .ace texture files can reduce their quality, you only want to open any particular .ace file once. After that, open the .tga file created here. This avoids the "making a copy of a copy of a copy" problem with runaway quality degredation. -
To begin modifying the texture's alpha channel, double click the alpha channel image. Or, use the Send Alpha Channel to Editor command on the Image menu.
When you do this, a Windows Paint window should open. If it doesn't, you might need to use the Reset Editor to MSPaint or Select Editing Program... commands on the Prefs menu. You should only need to do this once, to let TGATools2 know where the program file for the editor of your choice is. TGATools2A should use Windows Paint by default, however.
Most graphics editing software (especially back in the days of MSTS's birth) are not equipped to handle bitmap image files which contain an alpha channel. TGATools2 gets around this limitation by allowing the color and alpha portions to be separately edited, with any editor.
Once the editor window appears, it should look something like this:
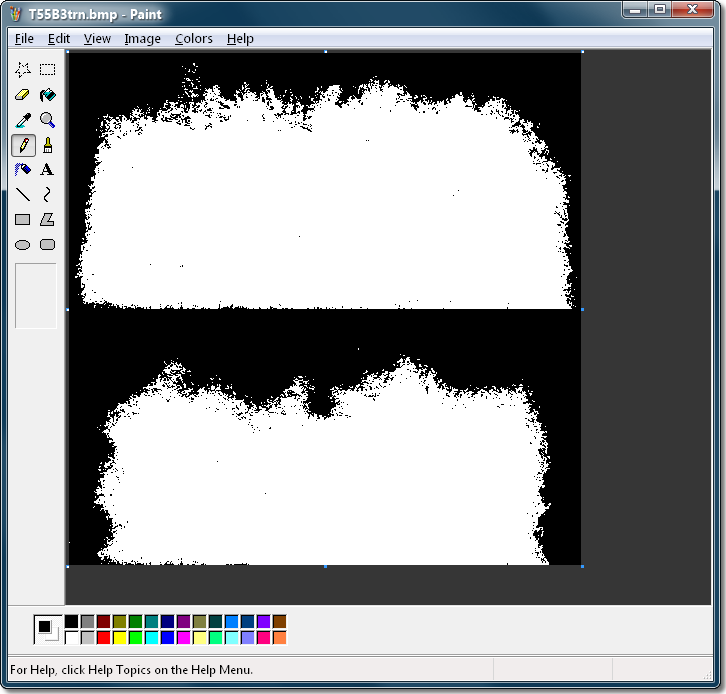 Figure 2 – The Windows Paint (XP) editor window with alpha portion loaded.
 -
Notice that TGATools2 has created a temporary .bmp bitmap file (see the filename in the title bar). While an editor window is open, it is important that you:
- Do not use the File, Save As command. Do not save the image to a different file, or TGATools2A will not pick up any changes you have made.
- Do not change the image format of the file. It must remain a bitmap file, and its color depth (bits per pixel) must not change.
- Do not try to use the TGATools2A window which launched the editor. It goes into a hard blocking while waiting for the editor processes to end. If it appears frozen or ghosted, do not worry—it will be fine after the editor program is closed.
-
Now that the image is ready for editing, it's time to do so. Let's say we want to make the top part of the image transparent, so it does not show up on shape files. The way to do this is to make its alpha section black, because black is fully transparent and white is fully opaque.
There are two ways to do this. If there are just a few, simple white regions to fill in, you can use the Paint Bucket tool to fill them in with black. But, if there are many small and/or separated areas (such as we have here), it's easiest to use the selection tool.
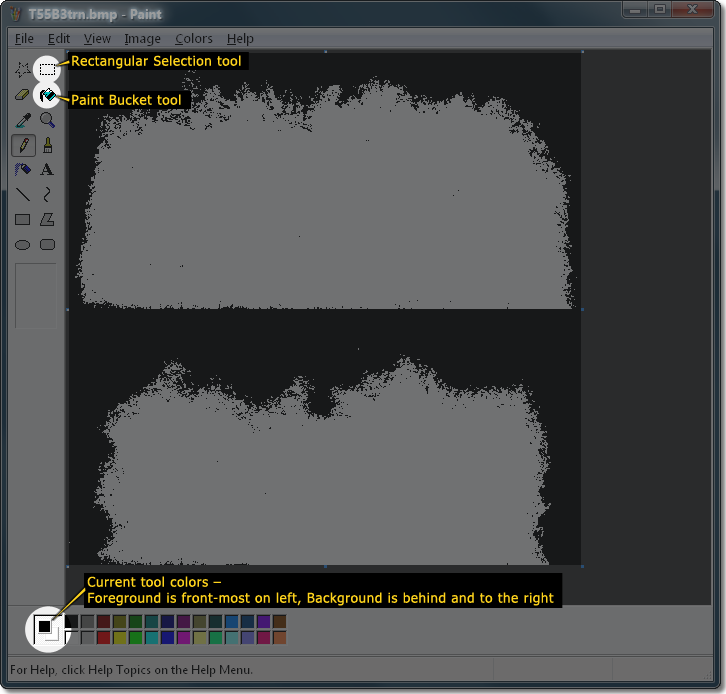 Figure 3 – Highlighting helpful parts of the Windows Paint (XP) editor window.
 - Select the color you want to use, in this case black. To change the current Foreground color, left-click a color in the color palette at the bottom of the window. To change the current Background color, right-click a color in the color palette. You can double-click any box in the color palette to change its color or examine its red-green-blue color values.
-
The Paint Tool
The Paint Bucket tool floods the space you click on with the current Foreground color. The color of pixel you click on is replaced in all directions up to and against all other colors in the image surrounding the point clicked. Only that exact color is replaced.
Select the Paint Bucket tool (see Figure 3 above). Make sure the color you wish to flood with is the Foreground color, and click where you want to apply it.
The Rectangular Selection Tool
The Rectangular Selection tool lets you draw an outline around a rectangular block of pixels for Copying, moving, transformation, or deletion.
Deleting a selection replaces all of the selected pixels with the current Background color. So, first, set the Background color to the desired color (black).
Then engage the Rectangular Selection tool (see Figure 3 above). Drag the mouse cursor across the area you want to remove to form the selection rectangle. You don't have to select exactly all of it in one go—you can do a couple, smaller operations.
Here's some of the area we're getting rid of selected. Note that I've set the Background color to black. (The Foreground color is also black.):
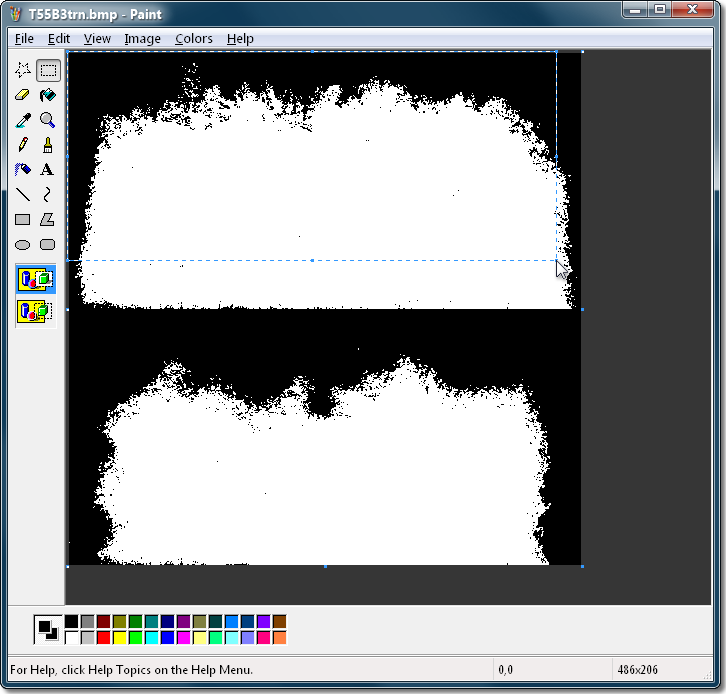 Figure 4 – Some pixels are selected in the top-left corner of the image.
Press the Delete key to delete the selected area, which replaces it with the Background color.
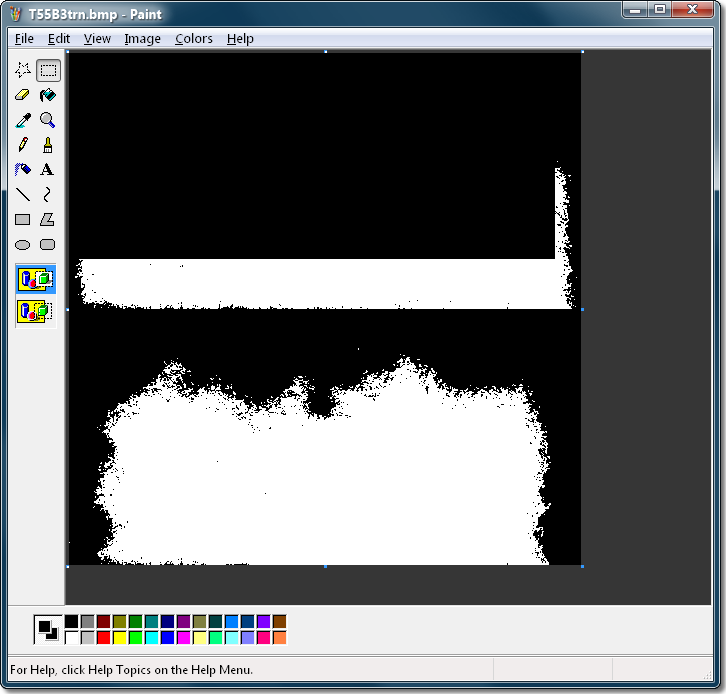 Figure 5 – The result after deleting the selected pixels.
You can repeat selecting areas and deleting them until the areas you want removed are all gone.
If you mess up, you can Undo. You can only undo the three most-recent operations. The fastest way to undo is to press Ctrl+Z
- When your editing is finished, save the file. Use the Save command on the File menu. You can also press Ctrl+S.
- Close the editor window. (Click the ❌ button, press Alt+F4, or use the Exit command. This will take you back to the TGATools2A window if you haven't switched windows since opening the editor.
-
Back at the TGATools2A window, you should see that it has picked up the changes you made to the temporary file, and has updated the shrunken image of the alpha channel accordingly.
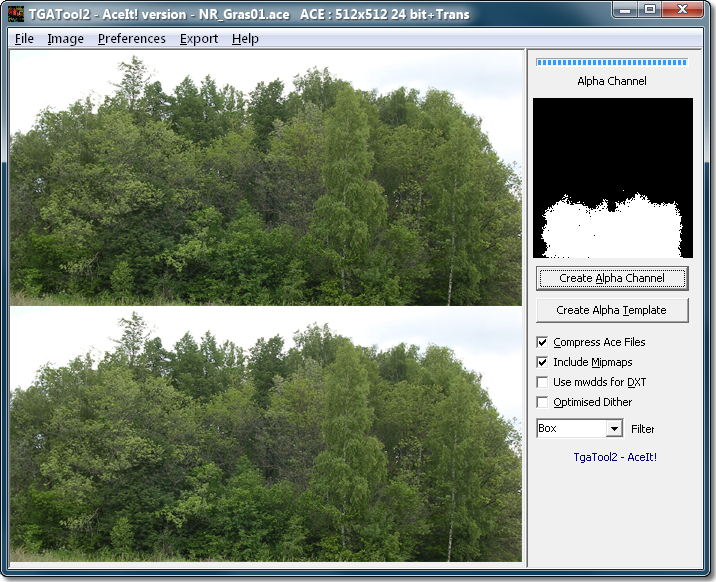 Figure 6 – The TGATools2A window with changes made to the alpha portion.
 - You can do the same kind of editing to remove the top part of the color portion of the texture, if you want. But, it isn't necessary, as those pixels will not ever appear since they're now transparent.
- Save the Targa (.tga) file. Use the Save command on the File menu. Unlike most applications, TGATools2A is coded to always prompt for a filename, even for the Save command.
- Once all the editing is completed, it's time to export the texture file to an .ace file. First, make sure the Compress Ace Files and Include Mipmaps options are checkmarked on the right-side panel of TGATools2A.
- To export, there are four "Ace" menu options to choose from on the Export menu:
- Ace (no Alpha)
- Ace (Alpha)
- Ace (‑Trans)
- Ace (DXT1)
OptionOutputsColor Bits†Alpha Bits†NotesAce (no Alpha)Flat bitmap, no alpha24 (16)noneTextures you want to be high-quality and which do not use an alpha channel.Ace (Alpha)Full 8-bit alpha24 (12)8 (4)Use this for textures which have alpha channels with shades of grey. Color granularity is greatly reduced.Ace (‑Trans)1-bit Alpha24 (15)1Use this for textures which only need pixels to be either transparent or opaque.Ace (DXT1)DXT Type 124 (16)(1)Implements native DirectX compression. Compression is destructive (image quality is lost) but color quality is not. Always has a 1-bit alpha channel, even if not used.
Select the menu option that applies best to the texture you're exporting. Since my example here is a "‑Trans" texture, as indicated in the title bar, you should use the Ace (‑Trans) option.
- TGATools2A will prompt for the name of the file to save the .ace texture. Enter the name of the existing .ace file you want to replace. Confirm Yes when prompted to overwrite the existing file.
- Close TGATools2A when you are sure you're finished editing the file. As long as it's left open, it will remember the filenames and paths you've been using (unless you use the Save As command).